Experiment Name: Backup and Restore of VMs of IBM Storage Protect Plus
Experiment Content:
IBM Storage Protect Plus is a solution that can be used for data protection of VM environments (e.g. VMware and Hyper-V), and enables the data protection and availability for virtual and physical machines of database like Oracle and SQL Server. This experiment will guide you to backup and restore VMware virtual machines quickly with IBM Storage Protect Plus (duration: 15-20 mins).
Experiment Resources:
IBM Storage Protect Plus 10.1.1 software
VMware vSphere 5.5 and VMware vCenter Server 5.5
- Red Hat Enterprise Linux 7.4 (VM)
Backup and Restore of VMs of IBM Storage Protect Plus
The following content is displayed on the same screen for your experiment so that you can make any necessary reference in experiment. Start your experiment now!
-
Log onto the SPP Management Interface
Click
≡in the top right corner of the screen
Click⚙︎ 选项, and find选择...(O), then click上移(U)to move英语(美国)[en-us]in the top and click确定. After fresh browser, GUI change to English version.Open the Firefox browser
 and click
 Sign into enter the SPP Management Interface.
Animated demo -
Customize the SLA Policy
Open the following tabs on the left navigation bar in order:
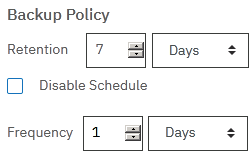
Manage Protection>Policy Overview, and click the Modify icon on the left of Demo underSLA Policies.RetentionandFrequencyindicate the length of backup retention and the backup frequency, for example:
It indicates that backup is Executeed every day, and each backup is retained for 7 days. ClickSave. To confirm, enter code displayed on the screen, and clickOKto complete SLA policy modification.
Note: In this experiment, all SLA policies are based on the policy Demo; in actual production, you may create one or more SLA policies with vSnap.
Animated demo -
Set up the SLA backup policy for VMs
Open the following tabs on the left navigation bar in order:
Manage Protection>Virtualized Systems>VMware;
under vCenter, open192.168.0.10>Datacenterin order,
and check the VM to be backed up:01_RHEL7.4_01;
click it toSelect a SLA policy;
under the SLA policy, check the policyDemo
and clickSaveto complete the setting.
Animated demo -
Execute the VM backup task
Under the
SLA Policy Status, find the policyDemo,
clickActionson the right and selectStartto execute manual backup immediately.
Note: In actual production, backup tasks will be automatically executed based on the time defined by the SLA policy, requiring no manual execution.
Animated demo -
Monitor the VM backup task
Click the
 to the left of the policy
 Demoto check the backup taskRunningon the top,
and then click the on the left to check the detailed information about the current execution.
After about 3 minutes, the backup can be completed and the status will be change toCompleted.
Animated demo -
Fast recover a VM
Open the second tab
Jobs and Operationson the left navigation bar, selectCreate Job,SelectRestoreand then select the following items one by one in the guide for jobs:
(1) Source type: VMware ,click Next
(2) Select source: 192.168.0.10 > Datacenter , and click to the right of 01_RHEL7.4_01,and click Next
(3) Source snapshot: selectOn-Demandas type of Restore, select the latest backup time point below, and clickNext;
(4) Set destination:Original Host or Cluster, and clickNext;
(5) Set network:Allow the system to define IPconfiguration, and clickNext;
(6) Restore method:Test, and clickNext;
(7) Review: after checking, clickSubmitand a pop-up appears with a prompt Recovery Created. You can find it in the "Running Job" until its completion. ClickOK. Quick recovery of the VM can be finished in about 20s.
Click vSphere Client in the remote desktop taskbar , and you will see
 01_RHEL7.4_01-test...VM.
Animated demo
Further Reading
Common QAs for IBM Storage Protect Plus
IBM Storage Protect Plus virtualized environment data protection solution (video)
Knowledge center manual for IBM Storage Protect Plus v10.1.1 (English version)
Related Links
Official website for IBM Storage Protect Plus
Installation and configuration standards for IBM Storage Protect Plus (English version)
Collection of documents related to IBM Storage Protect Plus (English version)


